Kart Design Inlet Seat For Keihin Carburators
Price $29.95 each
E-Mail beherr3@cox.net
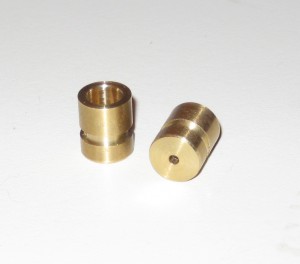
This is the Kart Design Inlet Seat. It is a direct replacement for the stock inlet seat on Keihin PWK and PWM carburetors. This seat allows accurate fuel level control when using Mikuni round and square pulse pumps or Dellorto pulse pumps. No bypass, tees, or restrictors needed. It allows the carburetor to work as originally designed using the stock float and fuel inlet needle.
Theory of Operation
The stock inlet seats on most Keihin carburetors used in karting today are between 3.4 and 3.8 millimeters. This gives an inlet area of up to 11.341 square millimeters. This works well when the carburetor is fed from the stock motocross gas tank. The height of the tank defines how much fuel pressure the carburetor sees. This is also known as head pressure. One psi equal 27.68068 inches of water. Most motocross bikes head pressure can vary between 3 and 18 inches of head pressure as the tank empties. That means the stock inlet seat is made to deal with between 1/10 to 2/3 of a psi. There currently are no pulse pumps that work at this pressure and deliver the volume required. A fuel pressure regulator can be used but it is difficult set one to work reliably at these low pressures.
When the major manufactures build a carburetor to work with pressure feed instead of gravity feed, they use different size inlet seats to deal with the higher inlet pressure. The size of the hole is not to act as a restriction to flow, but to control the area the fuel has to push on the inlet needle. This force is balanced by how hard the fuel in the float bowl pushes up on the float and is translated through the float arm to the needle. Because we can’t easily change the size of the floats or the leverage of the floats have on the needle, we change how hard the fuel pressure can push on the needle. The area of a 1.7 millimeter seat is approximately one quarter of what a 3.8 millimeter is. That means there is only one fourth of the force pushing the inlet valve open with the smaller seat. It also means that the smaller seat can control fuel pressures between 4/10 and 2 ½ psi, the range that current pulse pumps work at.
There may be some concern that the size of the inlet seat is smaller than the main jet and could restrict fuel flow in high demand situations. As long as the fuel supply from the pump is available, it will easily outpace the fuel that is drawn through the main jet.
Installation Instructions
Besides the usual tools needed to field strip your carburetor, you will need a 10/24 or 10/32 (M5x0.8mm if you’re a metric guy) tap and a way to turn the tap. A simple method uses a drill press to hold the tap straight while turning it by hand. The brass seat taps easily but you may find it helpful to drill the seat out to the size required for your tap. Use caution and only drill through the brass seat. If you drill too far you can ruin your carburetor.
- Remove the carburetor from the engine.
- Disconnect all fuel and vent lines.
- Remove the top cap, spring, and slide.
- Drain any fuel from the float bowl.
- Remove the enrichener assembly.
- After counting how many turns the air bleed screw is open, remove the screw and spring.
- Remove the idle speed screw and spring (if your carb has one).
- Remove the four screws that hold the float bowl on.
- Remove the float bowl.
- Slide the pin out that the floats pivot on.
- Lift the float assembly off of the carb. The needle valve may come with it.
- Remove the main jet.
- Remove the pilot jet.
- Clean the carburetor with carb cleaner to remove any oily residue. Allow it dry thoroughly.
- Measure how far above the casting the seat protrudes and note this dimension.
- With the carburetor upside down, start a tap (a 10/32,10/24 or M5x0.8mm tap will work) in to the brass inlet seat in the carb body. This is easiest to do on a mill or drill press, but it can be done by hand. It is helpful to start the tap as straight as possible.
- Run the tap in until it contacts the carb body casting beneath the seat. If you have a tap with a pointed end, you can continue to run the tap in until it forces the seat out of the casting. If your tap has a rough end on it you will need to take the tap out and run the corresponding sized screw in until it contacts the body and forces the seat out.
- Clean all the tapping chips from the carb passages. Compressed air works well, be sure to wear safety glasses.
- Place the carburetor upside down and position the seat in the body where the original seat was forced out.
- Press the seat down evenly until it is at the same dimension above the casting surface as the original. Absolute precision is not required, adjustment of the float can correct for slight differences. Pressing the seat in can be done using a drill press and an inverted 3/8 inch allen bolt. It is important to press the seat in straight and not damage the top edge of the seat.
- Re-assemble the carburetor in the reverse order of disassembly.
Float Setting
The float level should be initially set the same as it is at the factory If the seat is pressed in to the correct height the setting should be approximately correct. If it needs to be adjusted, minor bending of the float tab may be required. Try not to bend it more than required or damage may result.
Measure the height from the bottom of the float to the carburetor-body gasket surface. Correct height can be found on the chart.
PWK 16mm
PWM 6.5mm
To check the float level, hold the carburetor with the air cleaner flange up. Roll the carburetor back and forth a few degrees to allow the float to swing to the closed position. Watch the motion of the plunger in the inlet needle. When the needle stops moving but before the plunger starts to slide into the needle, is the point the float is considered closed.
If you get too much fuel coming out of your vent lines you will need to adjust the fuel level so it is lower (the needle valve closes sooner). This is something you have to approach a little bit at a time.
Vent Lines
The vent lines are an important part of the function of your carburetor. As your kart corners the fuel level in the carburetor will “climb” the side of the float bowl. By looping the vent line over the carburetor, the fuel can rise up the vent line but not be dumped overboard to the overflow bottle. Using small diameter clear vinyl tubing as a vent line (available at most hardware stores, Home Depot, and Lowes), run each vent line in a loop over the top of the carburetor by 3 or 4 inches and then back down to an overflow container. The over flow line from the bottom of the float bowl should turn down and run to the same overflow container as the other vent lines. Cut the ends of the lines at an angle so they won’t get blocked closed if they contact the sides or bottom of the container.
The container should be something that holds at least 12 ounces of liquid and be easily emptied. The lines should end in the upper third of the container and it must be well vented.
Fine Tuning
To help determine if your float level is correct you can monitor your over flow bottle and vent lines. At the end of a race, the lines should be just wet and have a small amount of fuel in the bottle. Much more than this indicates a fuel level that could be lowered. A bottle and vent lines that are always bone dry can indicate too low of a level. The kart can still run well in either condition but it’s useful to watch these items.
Fuel Pump Mounting/Maintenance
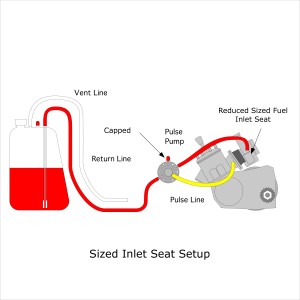
As with all fuel system, every part of the system is essential to optimal performance. The fuel pump is a major part of this. When using the small inlet seat, it MUST be plumbed directly and only to the carburetor. No bypass, tees, or return lines can be used.
The pump can be mounted above or below the carburetor. There are advantages to both positions.
Above the carburetor may make it so the pulse line can be routed to drain back to the engine but the pump has to work harder to pull fuel from the tank. If the pump is mounted on its side it can still collect oil and its performance become erratic.
Mounting below the carburetor helps the pump output stay consistent (pumps push fuel better than they pull) but is more prone to collecting oil in the pulse line and pump chamber.
In either case the pump should be checked for oil at least every other race day, more often if you’re running in cooler weather or use heavy oil/fuel ratios (i.e. around eight or ten ounces of oil per gallon).
The length of the pulse line from the engine to the pump should be kept to a reasonable minimum. It will pump fine with a long pulse line but is more prone to collecting oil. The line used should be firm enough to not “balloon” and lose the energy of the pulse but also not be so hard that you risk getting leaks at the ends. Regular vinyl fuel line works fine. When it gets hard after a few months, change it out for a fresh piece. It wouldn’t hurt to change all your fuel lines at the same time, it’s cheap insurance.